Table of Contents
![]() About the Author
About the Author
![]() Related Posts
Related Posts
Occasionally, you may create or download a wonderful image from a website, only to be let down by how small, blurry, and pixelated it seems. We can assure you that improving image resolution doesn't need much work, even if you are not an expert in photo editing. Once you quickly learned how to unpixelate images, creating appropriate designs became easier.
Due to technological advancements, numerous image enhancers can help you enhance those images. Please continue reading to find out how to repair pixelated images.
How to Unpixelate Images Easily
If you're still having difficulties getting clear pictures, consider the image corruption when you convert or compress the image source. The next part will mention how to repair and unpixelate images.
1. Use AI-powered Photo Enhancer
Try to use EaseUS Fixo Photo Repair to unpixelated images. A specialist file repair application is the best option in this situation. It has repair capabilities to help users quickly and efficiently fix files that aren't satisfactory. It also can unblur photos on Mac. PNG, JPEG, and BMP images are the many picture formats that can be fixed using our file repair website.
- Improve the resolution of grainy and fuzzy images.
- It only takes a few seconds to repair damaged images.
- View the restored photographs first after the repairs.
Free download EaseUS Fixo Photo Repair and repair pixelated images with these steps:
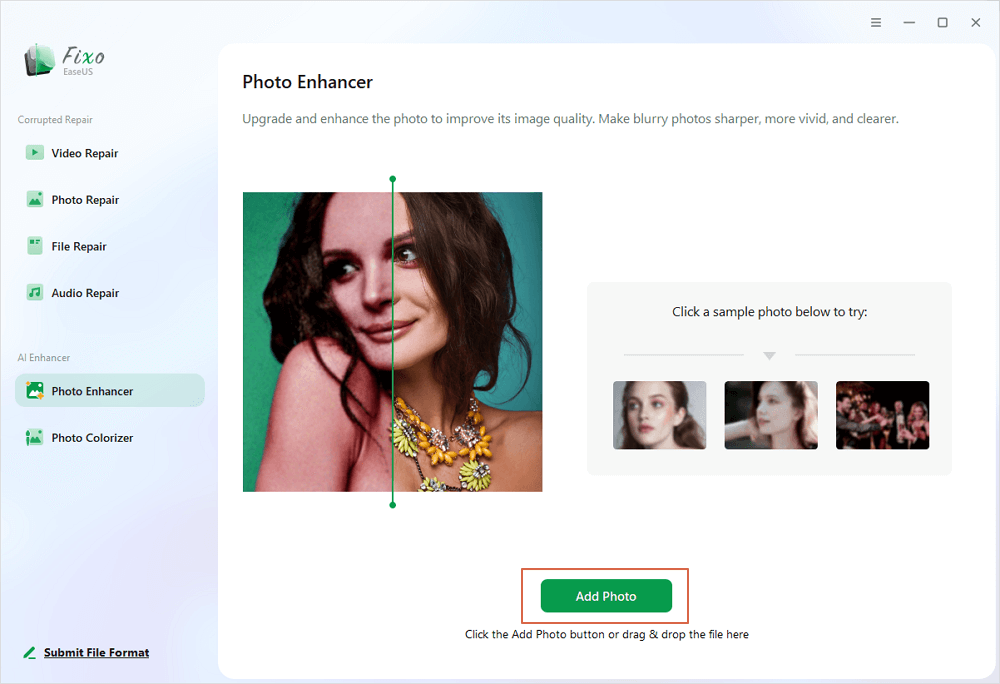
Step 1. Launch EaseUS photo enhancer on your Windows computer, and choose "Photo Enhancer". You can click "Add Photo" to enhance, unblur, upscale, and improve the quality of your photos with AI power.

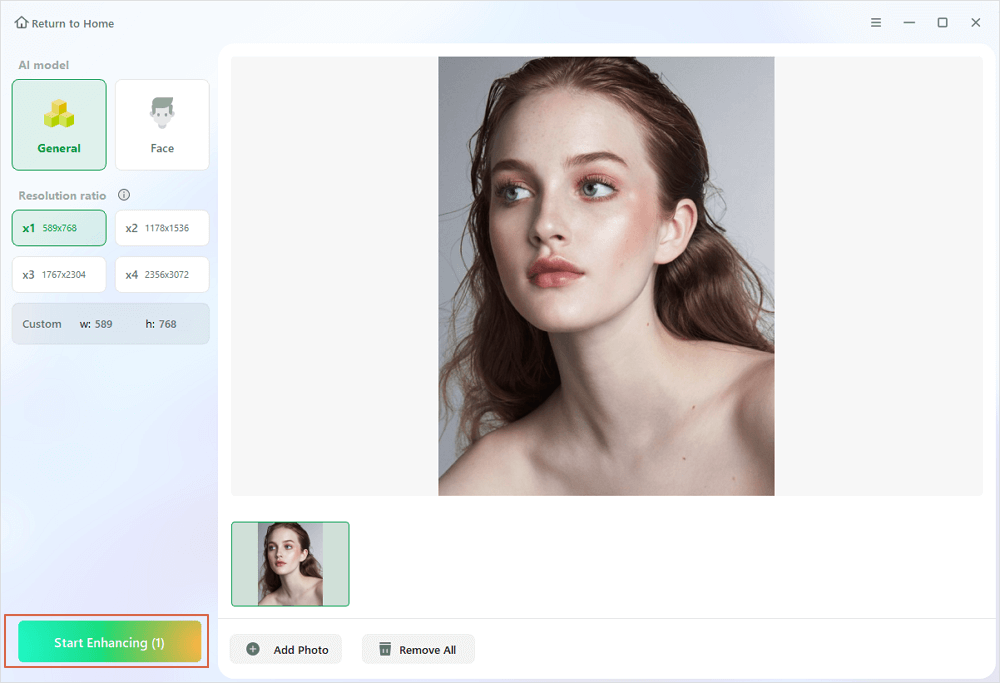
Step 2. You can choose the General or Face AI model and the resolution in this section. If you are enhancing a portrait, Face mode can improve the facial features better. Then, click "Start Enhancing" to enhance the uploaded images.

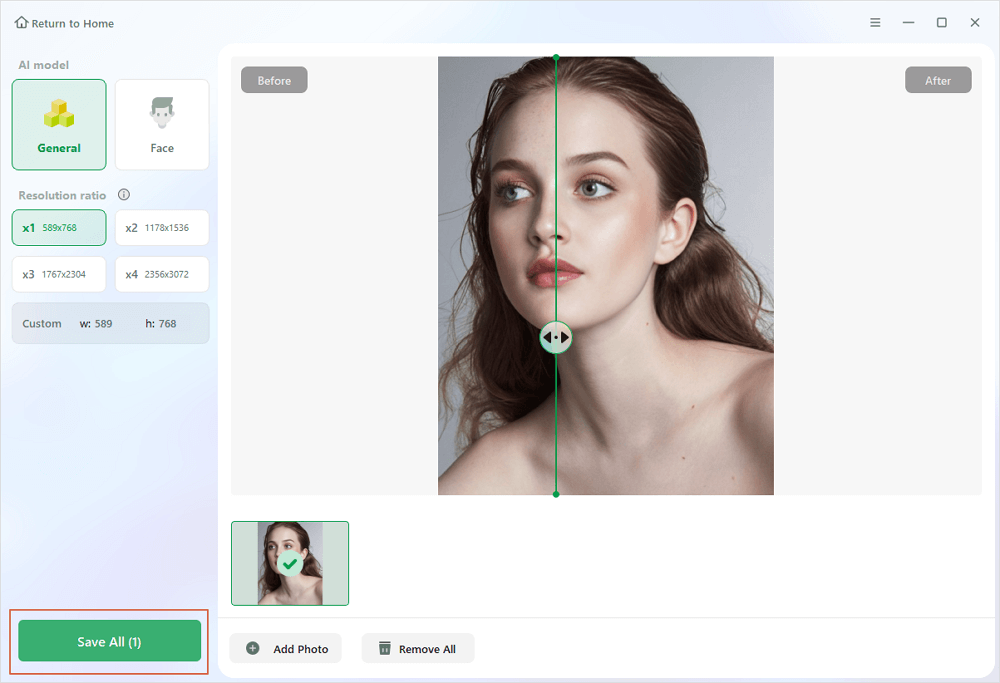
Step 3. Wait a moment and save all the enhanced photos on your PC by choosing the "Save All" button.

Many Windows 10/11 users have proved the efficacy of the tool. If you are interested in file repair, share it on Facebook, Twitter, Instagram, and other social media platforms!
2. Resize the Image and Adjust Settings
If you are dealing with a low-resolution image that has become pixelated after repair, try resizing the image to a smaller size. This can help reduce the pixelation and make the image appear sharper. You can also crop the picture to remove any unnecessary details causing pixelation.

If compression is causing pixelation in your pictures after repair, try adjusting the compression settings when saving the image. Use a lower level of compression or save the image in a high-quality file format to maintain the original quality. Avoid saving the image multiple times to prevent further degradation.
Causes of Pixelation in Pictures After Repair
There are several reasons why a picture may turn out pixelated after repair. Understanding the causes can help you determine the best solution to fix the issue. Here are some common reasons for pixelation in pictures after repair:
- Over-editing: One of the most common causes of pixelation in pictures after repair is over-editing. When you apply too many edits or adjustments to a photo, it can lose its original quality and become pixelated. This often happens when you try too much to enhance a picture's colors, contrast, or sharpness.
- Low-resolution images: Low-resolution images are another common cause of pixelation in pictures after repair. When you try to enlarge a low-resolution image, it can become pixelated because there are not enough pixels to maintain the quality of the image. This often happens when you try to print a small image at a larger size or crop a picture too much.
- Compression: Compression reduces an image's file size, making it easier to share or upload online. However, when an image is compressed too much, it can lose quality and become pixelated. This often happens when you save a picture multiple times or use high compression.
- Incorrect file format: Using the wrong file format can also cause pixelation in pictures after repair. Some file formats, such as JPEG, are lossy and can degrade the quality of an image each time it is saved. It is essential to use a high-quality file format, such as TIFF or PNG when working with images to prevent pixelation.
LEARN MORE
Still curious? Click here to learn about How to Fix Overexposed Photo.
How to Fix Pixelated Pictures FAQs
If you still have some questions about MacBook data recovery, check the quick answers below to help yourself out:
1. What is pixelated image?
When individual pixels in a digital image can be seen, as when you look closely at a huge shot and can see the small dots that make up the image, the term "pixelated" is used.
2. How do I take the blur out of a picture?
Photoshop will automatically assess the area of the image that will benefit from shake reduction, identify the type of blur, and apply the necessary adjustments to the entire image.
Conclusion
Pixelation in pictures after repair can be frustrating, but there are ways to fix it and restore your photos to their original quality. By understanding the causes of pixelation and using the solutions provided in this article, you can improve the appearance of your pictures and create stunning images that you can be proud of.
Remember to use editing software, resize the image, adjust compression settings, revert to the original, or use a photo repair service to help fix pixelated pictures after repair.
Was this page helpful?
About the Author
Jaden is one of the editors of EaseUS, who focuses on topics concerning PCs and Mac data recovery and repair tips. Jaden is committed to enhancing professional IT knowledge and writing abilities. She is always keen on new and intelligent products.
Repair & Enhance

- Repair corrupted videos, photos, documents, audio, and other files online with one click.
- Enhance blurry, grainy, and overexposed photos with advanced AI technology.
- Colorize black and white photos, restore old photos, and bring them back to life.
100% Safe Download